You know what’s cooler than calling API’s and services with Google Apps Script? Making your own API with Google Apps Script. After playing around with my first REST API with Python and Bottle, I wondered how this could be done even cheaper and quicker; without worrying about the complexities of databases and hosting.
When it’s simple and easy you are looking for, the answer is usually Google Apps Script. REST API’s and web services can be written in Google Apps Script in a matter of a few lines. It can then be easily deployed to the public as a web app. This post shows how to make a RESTful API for interacting with a Google Spreadsheet.
Planning Your REST API
[ultx]
First we’ll need an application, In this case, we are going to use a Google Spreadsheet with a product list as our application. We are going to allow clients to retrieve data from the spreadsheet.
Then we’ll have to decide how people can access and interact with the data from our application based on a URI schema. There is some limitation to request URIs with Google Apps Script. Namely, you cannot use URI extensions like “/products/get/” or “/products/list/”. Instead, everything must be done with query string parameters. In this case our REST service only has one method so we will be using the following schema to get information about the product:
?action=get&prodid=<product id>
For great insight into forming you URI schema see this StackOverflow question.
The API could also have methods to add or delete products and update quantities but for simplicity, I will let you think about what that looks like.
Finally, we will have to decide how data is structured when it is retrieved from the API. In this case, I will be using JSON, but it could be XML or Plain Text if you wanted. The Google Apps Script ContentService class has methods for formatting the data output in any way that you choose.
For a much more in-depth at designing an API, I would recommend reading these best practices.
[/ultx]
Making an Example REST API
[ultx]
doGet(), doPost() and URL Parameters
The most import things to understand are the Google Apps Script doGet() and doPost() methods. These methods take, as an argument, the request URI and decide what your application does with the request. For simplicity, version 1 of our API only accepts GET requests, so there is no need for the doPost() method. But you should know that the doPost() method does have some additional functionality.
When doGet() receives the URI, the Google Apps Script turns it into a request object that, to your application, looks like this:
Request URL:
<script web app url>?action=get&prodid=g1234&prodid=g2434
doGet Request Object:
{
  "queryString": "action=get&prodid=1234&prodid=2434",
  "parameter": {
    "action": "get",
    "prodid": "g1234"
  },
  "contextPath": "",
  "parameters": {
    "action": [
      "get"
    ],
    "prodid": [
      "g1234",
      "g2434"
    ]
  },
  "contentLength": -1
}
For more information about the request object, see https://developers.google.com/apps-script/guides/web#url_parameters.
*Its important to note to things: first is the difference between the parameter and parameters array. The parameters array returns a list of all prodid queries while the parameter object only shows the first in the URI and second is that you can use the query string to change your request, but you cannot, unfortunately, use variations the URL extension.
Application Logic and Plumbing
Now that the request URI is neatly formatted into a JavaScript object, all we have to do is translate that into a query for our spreadsheet so that we can return a JSON formatted response to the client. If this is a service, it may be, that all you have to do is run the request object through some logic or an algorithm and return the result. In this case, I used two helper functions to interact with data in a Google Spreadsheet.
The function, productQuery, takes a product ID as input and return the row corresponding to that product ID. The function formatProduct, takes a data from a spreadsheet row and turns it into an object with spreadsheet headings as object keys.
/* Take a product ID as input and return the
 * row corresponding to that product ID.*/

function productQuery(prodId){
 for (var i = 1; i < data.length; i++){
  if (prodId === data[i][0]){
   return data[i]
  }
 }
}

/* Take a spreadsheet (product) row and turn it into an object
 with spreadsheet headings as object keys. */

function formatProduct(rowData){
 var product = {}
 for (var i = 0; i < headings.length; i++){
  product[headings[i].toString()] = rowData[i]
 }
 return product
}
[/ultx]
doGet(): Returning JSON Data
[ultx]
Now that all the intermediate logic is taken care of, all we have to do is write the doGet method so that it takes the request URL and returns our JSON formatted product data.
function doGet(request) {
 // Check for a valid request URI
 if (request.paramter.action !== undefined){
  if (request.paramter.prodid !== undefined){
   prodIds = request.parameters.prodid

   // The object to be returned as JSON
   response = {
   products : []
  }

  // Fill the products array with requested products
  for (var i = 0; i < prodIds.length; i++){
   sheetData = productQuery(prodIds[i])
   product = formatProduct(sheetData)
   response.products.push(product)
  }

  if (response.products.length > 0){
   return ContentService.createTextOutput(JSON.stringify(response));
  } else {
   return ContentService.createTextOutput('Invalid Request. Product ID(s) not found.');
  }
 } else {
  return ContentService.createTextOutput('Invalid Request. Use at least one valid "prodid" parameter.');
 }
 else {
  return ContentService.createTextOutput('Invalid Request. Use a valid "action" parameter.');
 }
}
Now that everything is connected. The request to
<script web app url>?action=get&prodid=g1234&prodid=h2543
returns:
{
  "products": [
    {
      "id": "g1234",
      "name": "Baseball Glove (right)",
      "price": 60,
      "stock": 35
    },
    {
      "id": "h2543",
      "name": "Baseball Hat",
      "price": 40,
      "stock": 52
    }
  ]
}
The next step could be to add some kind of functionality that would allow the client to add a product as a line to the spreadsheet using a different “action” parameter. I’ll leave that to you to explore.
[/ultx]
Testing and Debugging
[ultx]
REST service is a bit different than writing a normal script in that the debugging feedback loop is a bit longer. Anytime you want to change your code and see how it is really working, you will have to:
- Save the script
- Create a new version of the App
- Deploy the App
To deal with this I found that it was a lot quicker to create a test wrapper function that would call the doGet function with a fake request URL object (shown above). This way you can use the Logger for quick inspection into your code.
When you’re ready to test your code in action. Try out PostMan, an HTTP client that is great for building queries and viewing the response.
[/ultx]
Deploying your REST Service
[/ultx]
All you have to do is…
- Save the script
- Click “Publish” in the Google Apps Script Menu
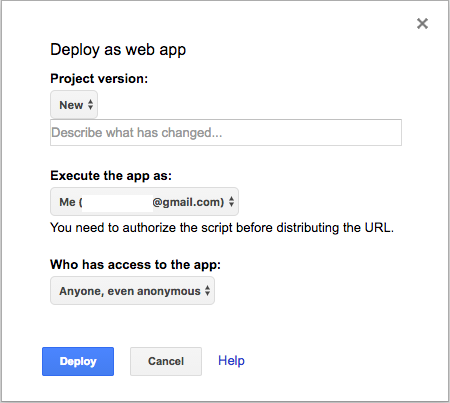
- Select “Deploy as web app”
- Create a new version of the App
- Deploy the App
You will need to specify who has access to your API before you deploy it. Since we are making an API, we must set the access permission to “Everyone (even anonymous).” Otherwise, your client will not be able to access your service unless it is a Google user. For more see the Google Apps Script documentation.
*Important Note: Because requests to Google Apps Script Web Apps return data from a 302 redirect URL, any client that will be accessing the service, must be capable of following redirects.
Otherwise, Google Apps Script provides a quick, cheap and easy way to create simple REST API’s and REST Services. View the full Script on GitHub or make your own! Planning it out will give you a great idea about how to interact with REST services as a client.
[/ultx]