LG Dryer not heating and stuck in Cooling Mode? Fix it with $10 & a screwdriver.
October 1, 2023
Recently, I had a problem with my LG dryer. I could turn it on, and it would run, but the clothes never dried because the dryer didn’t create any heat. On top of that, the cooling indicator light remained on from the beginning of the cycle until the end.
It turned out that it was an easy fix. The hardest part was waiting for the parts to arrive from Amazon. 🙂
In this post, I’ll share my journey to diagnose and fix this common problem and show you how you can fix it for about $10, a couple of hours, and a screwdriver.
The Cause
After some research, I learned that this issue was likely one of two things: a blown circuit breaker or a blown thermal fuse. The overwhelmingly common cause is a blown thermal fuse.
The LG manual states that the issue is one of three things:
- The house fuse (thermal fuse) is blown
- A circuit breaker has tripped
- A power outage has occurred
It’s probably a blown thermal fuse.
A thermal fuse is a critical safety device that protects your dryer from overheating. It monitors the temperature within the dryer’s heating chamber. If the temperature reaches an unsafe level, the thermal fuse will blow or trip, cutting off the electrical circuit to the heating element. This action prevents the dryer from continuing to heat, reducing the risk of overheating and potential fire hazards.
I never knew what a thermal fuse was, but I’m glad it exists…
A thermal fuse in a dryer can blow or “trip” for several reasons:
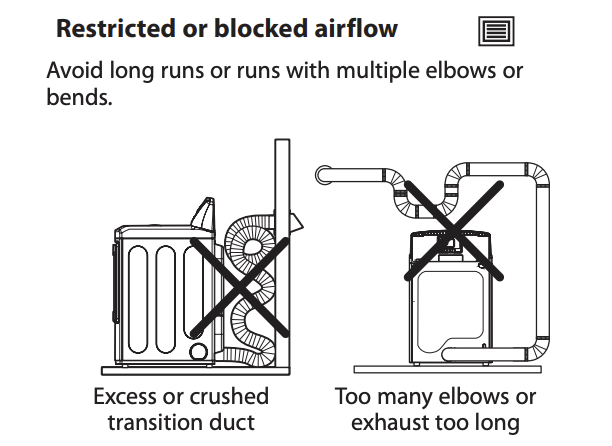
- Blocked or Restricted Venting: Insufficient airflow due to a clogged dryer vent or exhaust duct can cause the dryer to overheat. When hot air cannot escape, it builds up inside the dryer, triggering the thermal fuse.
- Lint Accumulation: Lint is highly flammable, and if it accumulates within the dryer, particularly around the heating element or in the exhaust duct, it can catch fire or cause the temperature to rise excessively.
- High Heat Levels: The heating element can get too hot if the dryer’s thermostat fails. This increased heat can lead to thermal fuse failure.
- Overloading the Dryer: Running the dryer with an oversized load can strain its heating element and other components, potentially causing overheating and thermal fuse activation.
- Faulty Components: Malfunctioning heating elements, thermostats, or other electrical components can lead to elevated temperatures in the dryer, resulting in thermal fuse blowing.
- Wiring Issues: Poor or damaged electrical connections and wiring within the dryer can generate excessive heat, leading to thermal fuse failure.
- Improper Use or Settings: Operating the dryer at excessively high heat settings or for extended periods without breaks can cause the dryer to overheat.
This often shows up after a d90 error.
If these sound familiar, you’re probably looking at a blown thermal fuse. In my case, the exhaust duct was crimped behind the dryer so the hot air could not escape, which overheated the dryer. This blew the fuse, and here we are…
Your options
You may have wondered, “Is it possible just to reset your dryer?” The answer is “it depends.” It depends on the existing thermal fuse inside your dryer. Some thermal fuses have a reset button built in, but most thermal fuses found in many LG dryers are designed as safety devices that cannot be reset. Once a thermal fuse blows, it usually means it has detected an overheating condition, and it needs to be replaced, not reset. Let’s move on to the solution.
The solution
Step 1. Get your tools and parts
I could recommend that you first test the parts that you’ll need to replace, but in my case, I decided to buy the parts first because they are cheaper than the testing device.
If you want to and you have a multimeter, you can first test your thermal fuse.
You only need three things:
- A new thermal fuse to replace a blown thermal fuse.
- A Philips head screwdriver to disassemble your dryer. (Yep, that’s it!)
- A butter knife (really) to release the tab that holds the top on
Step 2. Disassemble your dryer
Safety first! Remember to unplug your dryer.
I learned that disassembling a dryer is surprisingly easy. The thermal fuse is accessible by removing only 10. The trickiest part is removing the top. Here’s a helpful video to get started.
Once you’ve removed the top, you’ll need to remove the front face of the dryer and the drum. The video below covers that, and as long as you have a flashlight (it could be your phone) and a screwdriver, it’s a piece of cake.
Step 3: Replace the dryer’s thermal fuse
Now that you’ve removed the dryer drum, replacing the thermal fuse is just a matter of disconnecting the wiring and removing the screws that hold it to the dryer frame. This video provides thorough and clear instructions on how to get to the thermal fuse location and replace them.
Consider replacing your dryer vent duct
As I mentioned before, the problem was caused by the dryer vent duct. It had gotten really stretched out and banged up, restricting the flow of warm air leaving the dryer. After replacing the thermal fuse, cleaning out the dryer’s interior, and replacing the vent duct, the dryer worked way better than before the problem started.
If you found this post helpful, consider checking out the products I bought to fix my dryer.

LG Dryer Thermal Fuse
I bought this specific item because it said it is compatible with LG dryers. It was easy to install, and it’s working great.
$5
LG Dryer Moisture Sensor
I bought these because they are compatible with LG dryers. It comes with two because dryers have two sensor bars to begin with.
$10
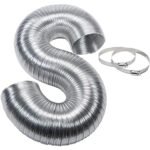
Replacement Dryer Vent Hose
I got a new one because the old one was so stretched out that it was a mess. It was nice to tidy up the area and reduce fire risk.
~$15
What LG Dryers does this apply to?
To make it really clear what dryers and parts these apply to, here are the model lists. Be sure to refer to your dryer manual when you start!
This thermal fuse (Part number 6931EL3003D) applies to the following LG dryer appliances: 81022, 81072, 81172, 81182, 81272, 81282, 81392, 81462, 81472, 81473, 81549, 81562, 81582, 81583, 81722, 81963, 81983, 48231014465, 43LH5700UD, CDE3379WD, CDE3379WN, DL, DLE0332W, DLE0442G, DLE0442W, DLE1001F, DLE1001W, DLE1101W, DLE1310W, DLE1501W, DLE2050W, DLE2101W, DLE2140W, DLE2150W, DLE2240W, DLE2250W, DLE2301R, DLE2301W, DLE2350R, DLE2350W, DLE2512W, DLE2514W, DLE2515S, DLE2516W, DLE2532W, DLE2601R, DLE2601W, DLE2701V, DLE3050W, DLE3170W, DLE3180W, DLE3400W, DLE3460V, DLE3460W, DLE3500W, DLE3733D, DLE3733S, DLE3733U, DLE3733W, DLE3777W, DLE4801W, DLE4870W, DLE4901W, DLE4970W, DLE5001W, DLE5070W, DLE5932S, DLE5932W, DLE5955G, DLE5955W, DLE5977B, DLE5977BM, DLE5977S, DLE5977SM, DLE5977W, DLE6942W, DLE7060VE, DLE7060WE, DLE7100W, DLE7177RM, DLE7177WM, DLE7200VE, DLE7200WE, DLE7300VE, DLE7300WE, DLE8377NM, DLE8377WM, DLE9577SM, DLE9577WM, DLEC733W, DLEC855R, DLEC855W, DLEC885W, DLEC888W, DLEG3571W, DLEV833W, DLEX0001TM, DLEX2450R, DLEX2501V, DLEX2501W, DLEX2550R, DLEX2550W, DLEX2650R, DLEX2650W, DLEX2655V, DLEX2801L, DLEX2801R, DLEX2801W, DLEX2901V, DLEX3001P, DLEX3001R, DLEX3001W, DLEX3070R, DLEX3070W, DLEX3250R, DLEX3250V, DLEX3250W, DLEX3360R, DLEX3360V, DLEX3360W, DLEX3370R, DLEX3370V, DLEX3370W, DLEX3470V, DLEX3470W, DLEX3550V, DLEX3550W, DLEX3570V, DLEX3570W, DLEX3650V, DLEX3700R, DLEX3700V, DLEX3700W, DLEX3875V, DLEX3875W, DLEX3885C, DLEX3885W, DLEX3900B, DLEX3900K, DLEX3900W, DLEX4070V, DLEX4070W, DLEX4270V, DLEX4270W, DLEX4370K, DLEX4370W, DLEX4500B, DLEX5000K, DLEX5000V, DLEX5000W, DLEX5005K, DLEX5101V, DLEX5101W, DLEX5170V, DLEX5170W, DLEX5175W, DLEX5680V, DLEX5680VE, DLEX5680W, DLEX5680WE, DLEX5780VE, DLEX5780WE, DLEX5955W, DLEX6001W, DLEX7177RM, DLEX7177WM, DLEX7600KE, DLEX7600ME, DLEX7600VE, DLEX7600WE, DLEX7700KE, DLEX7700VE, DLEX7700WE, DLEX7710VE, DLEX7710WE, DLEX7800VE, DLEX7800WE, DLEX7850WE, DLEX7880WE, DLEX7900BE, DLEX8000V, DLEX8000W, DLEX8100V, DLEX8100W, DLEX8377NM, DLEX8377WM, DLEX8500V, DLEX8500W, DLEX9000V, DLEX9000W, DLEX9500K, DLEX9500V, DLEX9500W, DLEY1201, DLEY1201V, DLEY1201W, DLEY1701V, DLEY1701VE, DLEY1701W, DLEY1701WE, DLEY1901KE, DLEY1901WE, DLG0332W, DLG0452G, DLG0452W, DLG1002W, DLG1102W, DLG1320W, DLG1502W, DLG2011W, DLG2051W, DLG2102W, DLG2141W, DLG2241W, DLG2251W, DLG2302R, DLG2302W, DLG2351R, DLG2351W, DLG2522W, DLG2524W, DLG2525S, DLG2526W, DLG2532W, DLG2602R, DLG2602W, DLG2702V, DLG3051W, DLG3171W, DLG3181W, DLG3401W, DLG3461V, DLG3461W, DLG3501W, DLG3744D, DLG3744S, DLG3744U, DLG3744W, DLG3788W, DLG4802W, DLG4871W, DLG4971W, DLG4971WE, DLG5002W, DLG5071W, DLG5932S, DLG5932W, DLG5966G, DLG5966W, DLG5988B, DLE0442W01, DLE5977WM, DLE2522W, DLE2524W, DLE3777E, DLEX6001V, DLEX8377N, DLE3180W/00, DLE7200VE/00, DLEX4370K/00, DLEX4370W/00, DLEX5680VE/00, DLE7200WE/00, DLEX2550R/00, DLEX3700V/00, DLEX3700W/00, DLEX3370V/00, DLEX3370W/00, DLEX3370R/00, DLEX8100V/00, DLEX7800VE-ASSEEUS, DLEX7800VE-ABWEEUS, DLE7300VE/00, DLEX7880WE/00, DLEX4200W/00, WKE100HVA, WKE100HWA, DLE3600W/00, DLE3600V/00, DLEX4000W, DLE7000W/00, DLEX4200B/00, WKEX200HBA/00, DLEX4000B/00, WKEX200HWA/00, DLEX4500B/00, DLE7150W/00, DLEX7800WE/00, DLE7300WE/00, DLEX3570W/00, DLEX4000W/00, DLEX9000V/00, DLE7400WE/00, WKE100HVA/00, DLEX9500K/00, DLE7400VE/00, DLEX8900B/00, DLEX7600WE/00, DLE2050W/00, DLE7100W/00, DLE3500W/00, DLE3600W, DLEX8980V, DLE3470W-ABWEEUS, DLE3470W-ABWEUUS, DLEX5500V-ASSEECI, DLEX5500V-ASSEEUS, DLEX5500V-ASSEUUS, DLEY1201V-ASSEEUS, DLEY1201V-ASSEECI, SWWE50N3, WKEX300HBA-ABLEECI, WKEX300HBA-ABLEEUS, DLE7150M, DLEX6700B-ABLEECI, DLEX6700B-ABLEEUS, WKE100HWA-ABWEEUS, WKE100HWA-ABWEUUS, DLE6100W-ABWEECI, DLE6100W-ABWEEUS, DLE6100W-ABWETUS, DLE6100W-ABWEUUS, DLE8400WE-AEWEEUS, DLE8400WE-AEWEUUS, DLE8400BE-AEBEEUS, DLE8400BE-AEBEUUS, DLE8200W-AEWEEUS, DLE8200W-AEWEUUS, DLE6100M-ABMEECI, DLE6100M-ABMEEUS, DLE6100M-ABMETUS, DLEX7480LE-APBEEUS, DLEX7480LE-APBEUUS, DLEX6500B-ABLEECI, DLEX6500B-ABLEEUS, DLEX6500B-ABLEUUS, DLEX8600BE, DLEX5500W-ABWEECI, DLEX5500W-ABWEEUS, DLEX5500W-ABWEUUS, DLEX7250W, DLEX4080B-ABLEEUS, DLEX4080B-ABLEUUS, DLEX4080W-ABWEEUS, DLEX4080W-ABWEUUS, DLEX9900S, DLE3470M, DLEX6500W-ABWEEUS, DLEX6500W-ABWEUUS.
This thermal fuse cut off kit (Part numbers 6931EL3001F and 6931EL3001F) applies to the following newer LG appliances: 61452, 61462, 61463, 61553, 81362, 81462, 81463, 81562, 81563, 81782, 81963, 81982, 81983, DLE1001F, DLE1001W, DLE1101W, DLE1501W, DLE3170W, DLE3180W, DLE3400W, DLE3460V, DLE3460W, DLE3500W, DLE4970W, DLEX3370R, DLEX3370V, DLEX3370W, DLEX3570V, DLEX3570W, DLEX3700R, DLEX3700V, DLEX3700W, DLEX3900B, DLEX3900K, DLEX3900W, DLEX4270V, DLEX4270W, DLEX4370K, DLEX4370W, DLEX4500B, DLEX5000K, DLEX5000V, DLEX5000W, DLEX5005K, DLEX5680W, DLEX5680WE, DLEX5780WE, DLEX7600KE, DLEX7600ME, DLEX7600VE, DLEX7600WE, DLEX7700KE, DLEX7700VE, DLEX7700WE, DLEX7710VE, DLEX7710WE, DLEX7800VE, DLEX7800WE, DLEX7850WE, DLEX7880WE, DLEX7900BE, DLEX8100V, DLEX8100W, DLEX8500V, DLEX9000V, DLEX9000W, DLEX9500K, DLEY1201V, DLEY1701V, DLEY1701VE, DLEY1701W, DLEY1701WE, DLEY1901KE, DLEY1901WE, WKEX200HWA, DLEX8980V, WSEX200HNA, DLE3600V, DLE3600W, DLEX4000B, DLEX4000W, DLEX4200B, WKEX200HBA.
Note: The thermal fuse above is included in the thermal fuse cut-off kit. Some models may require the kit rather than just the fuse.
The thermal fuse also works with Kenmore Dryers.
As it turns out, the same thermal fuse also works for these Kenmore appliances: 7966142310, 7966142410, 79661422410, 79661423410, 79661512210, 79661513310, 79661522210, 79661523210, 79661622310, 79669272012, 79669272900, 79669278000, 79669278010, 79669278900, 79669472000, 79669478000, 79680021900, 79680272900, 79680518900, 79681022900, 79681028900, 79681029900, 79681072310, 79681073310, 79681172210, 79681182310, 79681272210, 79681382410, 79681383410, 79681472210, 79681532110, 79681532210, 79681538110, 79681538210, 79681542110, 79681542210, 79681573210, 79681722010, 79681728010, 79682192900, 79682198900, 79682199900, 79688842800, 79688852800, 79681982410, 79681983410, 79661512211, 79681582410, 79681583410, 79661552610, 79661553610, 79681392610, 79681393610, 79681962710, 79681362910, 79681728000, 79681782710, 79681073311, 79574113711, 79681563910, 79681182311, 79681582411, 79681562910
You can do it!
I hope you find fixing your dryer as satisfying as I did!