If you followed the previous post about getting started with Pelican, you should have a Pelican website up and running on your local machine. This is where a lot of web development tutorials stop and that has always frustrated me. There are a million and one places to learn how to code online but just because you learned how to write a for-loop doesn’t mean you can actually make anything. This post is meant to help bridge the gap between “starting a web project” and starting a web project on the actual web.
The goal of this post is to get your collection of HTML files that you’ve built using pelican content uploaded to Amazon S3 so that everybody can access your site on the web!

Why host on Amazon S3?
In the last post, I discussed why I chose to build a static site with Pelican and there was a similar set of considerations why I chose to host this project on S3. I will address the main two:
Why not Github Pages?
Github Pages is, of course, awesome. There is no easier way to host a static site on the web and best of all it’s free. So why didn’t I choose the path of least resistance? The answer is configurability and server access logs. GitHub Pages definitely favor simplicity over configurability, and as a result, don’t give you many options for tweaking your site. That’s great for most but not for exploring the technical side of SEO where logs are really important.
Why not Netlify?
Netlify is also very cool. Like GitHub Pages, Netlify allows you to deploy sites from GitHub. It also strikes a good balance between simplicity and configurability—leaning more to the configurable side than GitHub Pages. It also has a host of very cool features, many of which are available for free. If I were just doing this as an ordinary web project, I probably would have chosen Netlify, but because this is meant to introduce more of the bare metal concepts, AWS wins out.
On top of those questions, there are really good reasons to choose AWS in its own right:
- It’s huge. So many companies host their sites and apps that it’s worth getting familiar with their concepts and terminology.
- It’s huge. AWS has so many services that you can take advantage of. We’re only taking advantage of S3, Route 53, and CloudFront but starting with AWS makes it easy to scale your projects if you want to do something crazy.
- It’s huge. The Cloudfront CDN is among the best out there and it allows us to mess around with HTTP headers and send the server access logs to an S3 bucket so they are as easy to access as our site.
On the flip side, AWS (and Amazon) is huge. So that may be a consideration for choosing other hosting solutions or CDNs. There are lots out there to choose from. I’d say just google them, but if you’re not into big corporations, I’d say, go try DuckDuckGo.
Prepare your static site for the cloud
Luckily, I don’t need to reinvent the wheel much here. @Kent put together an excellent technically-focused walkthrough. The only difference between this tutorial and his is that we are going to use Route 53 instead of a Cloudflare.
Up to this point, you should have a /output directory that has a handful of HTML files after running pelican content. You could put an article in your /content directory to generate your first article. For instruction on adding an article, refer to the Pelican articles docs.
That said, you don’t need any articles yet to keep pushing forward to get your site live.
Setting up relative URLs in your pelicanconf.py file
You may have already modified your pelicanconf.py file in order to apply your Pelican theme. If you haven’t it’s time to make your first modification (and a very important one).
What is a relative URL? you might ask. That’s a good question and an important one when it comes to hosting your site on the web. Relative URLs are URLs that start with the URL path rather than the protocol (https://) and the hostname (www.yoursite.com). In other words, they look like this: /my-folder/some-page/.
Why is that important? We are going to move all the site’s pages your computer, (http://localhost/) to an S3 bucket with a URL like yoursite.com.s3-website.us-east-2.amazonaws.com/, and in the future to your chosen domain name (something like yoursite.com). If the site refers to internal pages by relative, instead of absolute URLs, you won’t have to worry about every internal link breaking every time you change your hostname. (This is also really important when it comes to domain migrations!)
 # Uncomment following line if you want document-relative URLs when developing
 # RELATIVE_URLS = True
By default, Pelican will prefix all your URLs with http://localhost:8000 when you’re building your site locally. In order to change this to relative URLs, there is an easy switch in your pelicanconf.py file. All you have to do is find these lines and uncomment the line that says RELATIVE_URLS = True.
Setting up your Amazon S3 Bucket
S3 stands for “Simple Storage Service.” The concept is quite simple, S3 provides you with “buckets” to host your content on their servers. It’s great: there’s no need to configure or manage a server. Buckets can be public or private but for our purposes, we’ll have a public-facing bucket.
Uploading a site to an S3 bucket is pretty simple but first, let’s set up an S3 bucket. You will, of course, need to set up an AWS account. If you don’t have an account yet, you’re in luck. You can start up your account for free for one year!
Creating your first S3 Bucket
Once you have an AWS account, follow these steps to create a bucket.
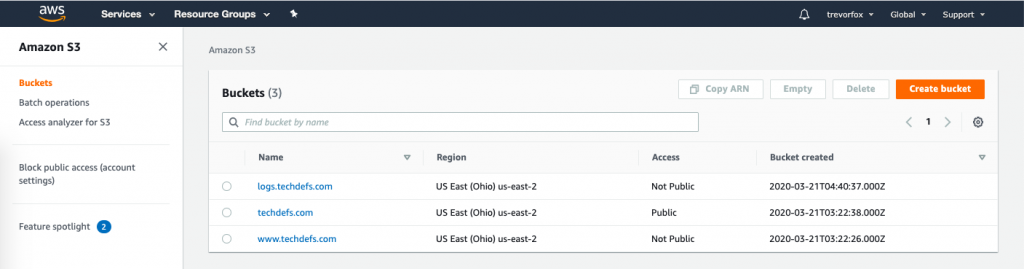
- Go to your S3 console: https://console.aws.amazon.com/s3
- Click the “Create bucket” button
- Name your bucket after the domain name you plan to use. My project is going to live at techdefs.com, so I named my bucket “techdefs.com”.
If you haven’t decided on a domain name, now’s a good time to head over to Amazon Route 53 and find one that’s available.
- Select a Region where you would like your content to be hosted… You could choose one near where your audience is likely to be, or you could choose based on price. I chose US East (Ohio) but to be honest, for this project, it doesn’t really matter.
- Un-select “Block all public access”.This will allow your website content to be accessed publicly on the web.
- Click “Create Bucket” at the bottom of your screen to finalize your bucket.
Configure your S3 Bucket to host your site
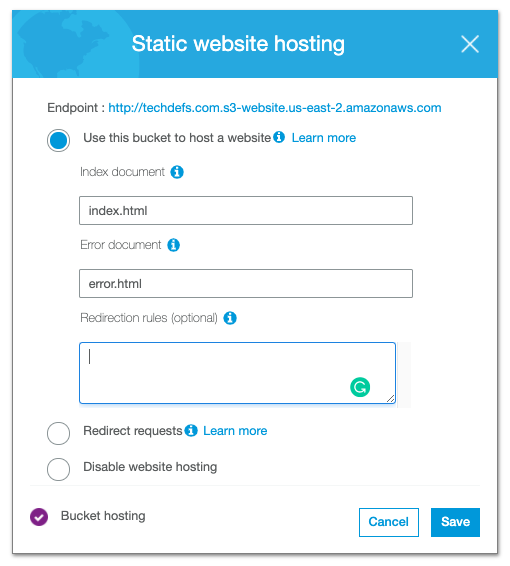
- Open the bucket Properties pane
- Choose “Static Website Hosting“
- Choose “Use this bucket to host a website”
- Name of your index document in the Index Document box. For Pelican sites, the index (aka homepage) document is index.html.
- Click Save to save the website configuration.
- Copy your Endpoint URL and paste it somewhere for later use
Configure public access for your S3 Bucket
The last step will be to set the bucket’s security policy to allow public access (so everyone can view it on the web). Bucket policies determine who can access your buckets and what level of permissions they can have. For example, you might only want to grant view access to some people and write access to others. Read more about s3 bucket policies here.
For our purposes, we are going to allow “PublicReadForGetBucketObjects” for the objects (HTML files) in the bucket that hosts the site. See step #3 below for more details.
Go to your new bucket and go to the Permissions tab
You should see “Block all public access“ is set to “Off”
- Click Choose Bucket Policy
- Paste in the following policy and replace
yoursitename.comwith you actual site’s name
 {
    "Version":"2012-10-17",
    "Statement":[{
   "Sid":"PublicReadForGetBucketObjects",
          "Effect":"Allow",
     "Principal": "*",
        "Action":["s3:GetObject"],
        "Resource":["arn:aws:s3:::yoursitename.com/*"
        ]
      }
    ]
  }

- Click Save
Congrats, you have your first S3 bucket! Now let’s fill it with your website!
Upload your site to your S3 Bucket
There are two ways to do this. One is easy but manual, and the other takes a bit more time to set up but automates the process for the future. Since we have spent most of the time on this post “setting things up,” first we are going to do it the easy way first so we can see the site live on the web!
- Go to the Overview tab
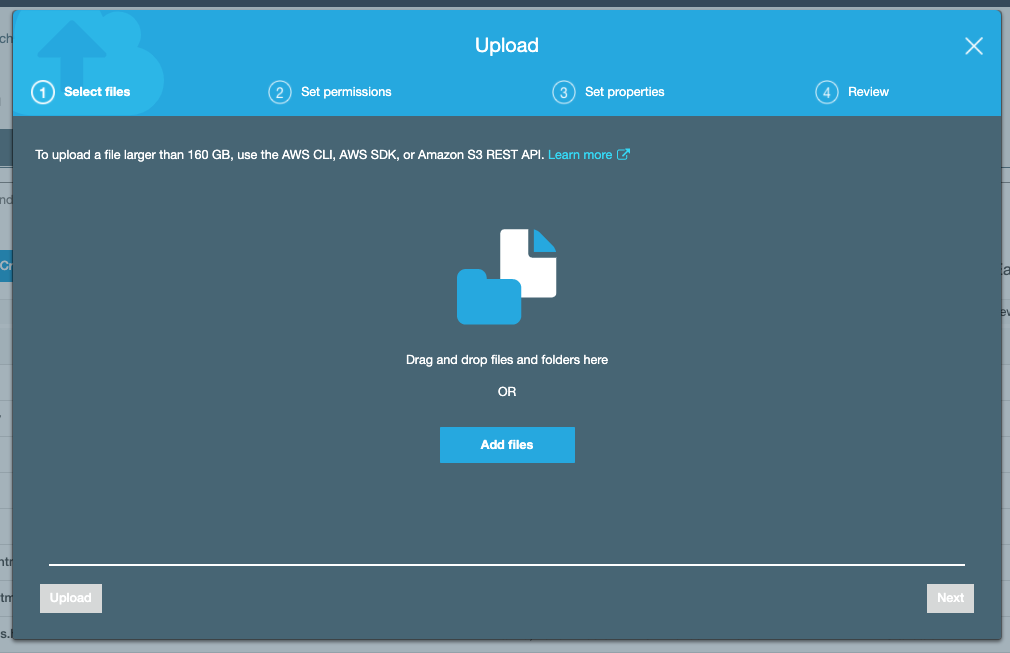
- Click Upload
- Open up a Finder window (assuming your using Mac) and navigate into your /output folder
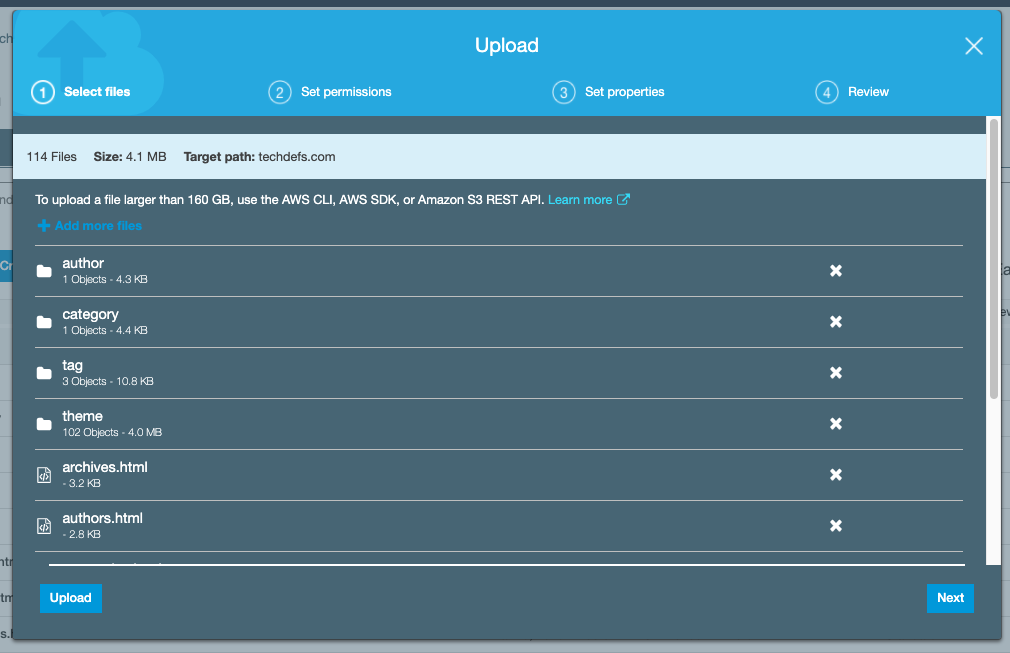
- Drag and drop all the files in /output into the Upload box (not the /output folder itself)
- Click Next to proceed
- Set “Manage public permissions” to “Grant public read access to this object(s)” and click Next
- Leave the Storage Class set to Standard and on the “Set Properties” step and Click Next
- Click Upload on the Review step
- Your files will be uploaded to S3 shortly
If everything has gone well up to this point, your site is ready to view!
Paste your Endpoint URL from step #6 of the “Configure your S3 Bucket to host your site” section above.
🎉🎉🎉 Your site is (hopefully) live! 🎉🎉🎉
Troubleshooting
Maybe it didn’t work perfectly… That makes a good opportunity to learn!
If your homepage looks like CSS rules weren’t applied
View the HTML source of your page and check if the CSS links look right. (They might be pointed to localhost). Go back to the “Setting up relative URLs in your pelicanconf.py file” step and check that everything looks good.
If your homepage displays an XML error saying that you don’t have permissions
This is probably because you missed a step setting up public permissions. Recheck the “Configure public access for your S3 Bucket” step and the “Upload your site to your S3 Bucket“ step to ensure that your site has public permissions.
Moving on
You might be satisfied here… I mean you have a website up and hosted. As you add articles, you can upload them to S3 as you’ve done before. But… you don’t have a cool URL and the deployment process is still pretty manual. And we haven’t even done any fun SEO stuff.
In the next posts, we’ll set up a custom domain with Route 53 and set up an automated s3 upload process. Then, we’ll do some interesting SEO stuff.