Adding a Hubspot Data Layer for Personalization and Profit
September 15, 2018
As we all know, the data layer (dataLayer if you’re a nerd) is a great way to provide data about an application, it’s users, and, it’s content to analytics and marketing technologies. But one thing that is underappreciated about the data layer is that it provides context for personalization.
There are a number of ways to employ the dataLayer for personalization. There are tools like Optmizely and Google Optimize, and an open source tool that I think is especially interesting called Groucho. (If you are interested in trying it for WordPress you can try my plugin 🙂 )
Another way to personalize that is a lot more accessible to many websites is chat. I have been working on a project that uses Drift as the chat/chatbots and Hubspot as a CMS. This has made it possible to explore the options for personalizing chat dialogs based on the characteristics of a given user, like funnel stage and lead score.
This Hubspot + Drift project is still early days, but one of the early problems what I needed to solve was getting the contextual data from Hubspot to the dataLayer so I could start to segment out content, and personify users. There was a surprising lack of information on this topic (perhaps because Hubspot would rather have you use their lackluster web analytics solutions so I decided I would open up the discussion and show how to initialize a data layer in Hubspot.
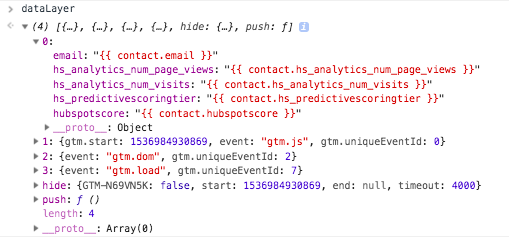
This is what we are going to achieve, except with real values.
Where to put the Data Layer code
Let’s dive right in because it is not even that complicated. * Note, this assumes you have the required permissions to modify page templates in Hubspot.
If the data from the data layer is to be sent with a tag as soon as Javascript runs (“gtm.js”) then you need to write your dataLayer initialization above the Google Tag Manager snippet. The best way to do this is to write the data layer right into the page template. That way you can be sure GTM has access to the dataLayer variables when GTM is initialized.
The other way that is a bit lighter on the code modifications is to write the code into the “Additional <head> markup” section if you are using a drag and drop template. The downside here is that you will have to push the data to the data layer with an arbitrary event, (eg {event: 'hsInitialization'}) if you want to fire a tag before gtm.dom because gtm.js will fire before the dataLayer initialization. You should be thinking, “ok, I’ll modify the template directly,” or create and embed a Hubspot module to generalize the dataLayer initialization.
Ok! I will show some code before navigate “back.”
Writing the Data Layer to the Page
Your Hubspot dataLayer initialization (above the GTM container) will look something like this:
<script> var dataLayer = [{ email: "{{ contact.email }}", hubspotscore: "{{ contact.hubspotscore }}", hs_analytics_num_page_views: "{{ contact.hs_analytics_num_page_views }}", hs_analytics_num_visits: "{{ contact.hs_analytics_num_visits }}", hs_predictivescoringtier: "{{ contact.hs_predictivescoringtier }}" }] </script>
This code snippet puts the current page’s email, lead score, number of page views, number of visits, and predictive scoring tier in the dataLayer. That seems kinda handy for some personalization rules, right?
This is also a great way to reconcile your Google Analytics tracking against Hubspot data by using Google Analytics custom dimensions for contact variables.
* Notes: Yes, you do need script tags. Yes, you do need to put double quotes around HubL variables. Yes, you can choose what variables to write to put into the dataLayer. Keep reading…
HubL and Hubspot Variables
Hubspot uses its own templating language they call HubL. (Hubspot Language, get it!?) HubL is based on a templating language called Jinja which, conveniently, is also used by Drift. HubL provides access to any Hubspot variables that you have about a contact. For example, the code, {{ contact.email }} would print the current user’s (aka. contact’s) email to the page. I am only going to say it once: Be careful with personally identifiable or sensitive data.
You can initialize your dataLayer with all kinds of data about the Contact, the Content, the page Request, Blog posts, and even your Hubspot account if you wanted to. Check out Hubspots docs for a pretty comprehensive list of Hubspot variables.
If you have custom contact variables, you can find those names here: https://app.hubspot.com/property-settings/<yourhubspotAppID> Use the “Internal Name”. Eg. {{ contact.internal_name }}
Be smart about the variable names that you use. You can choose variable names that don’t seem obvious if the user was to “view source.” And you can use Jinja to modify the variables (maybe to something a bit more obvious or anonymous) before printing them to the page.
Things that make you go WTF?
My biggest annoyance was that Hubspot does not seem to expose the Hubspot user ID in HubL. That would be very handy for a user ID in Google Analytics. You could use the Hubspot “hubspotutk” cookie for that purpose though but that isn’t quite as good. Other than that, everything is pretty clean. Just remember to use double-quotes and follow the rest of the * Notes from earlier.
I hope this helps you create a better experience for your website users. Go on and personalize! Just don’t be creepy!